A practical foundation guide for print shop art departments that prepare, repair, preflight and approve artwork before it enters a DTF production workflow.
DTF artwork training gives an art department a repeatable way to receive, inspect, repair, proof and release files before they enter production. It is not printer-operation training. It is the design-side discipline that prevents the wrong artwork, wrong size, weak pixels, unwanted backgrounds, bad edges and incorrect revisions from reaching the RIP.
For print shops, this distinction matters. A DTF printer can only output the file and settings it receives. A clean art file does not guarantee a perfect transfer, because the RIP, white ink, film, powder, cure, heat press and garment also affect the result. But a bad file creates avoidable risk before production even starts.
Quick answer: DTF graphic design means turning customer artwork into a controlled production file with the correct content, final size, image quality, transparency, edge quality and revision. The art department should prepare the file without guessing printer-specific settings that belong to the RIP or print vendor.
What Is DTF Artwork Training?
DTF stands for Direct-to-Film. In a typical workflow, the design is printed onto specialized transfer film. Hot-melt powder is applied to the printed film and heated to form a transferable layer. The transfer is then applied to fabric with a heat press. Mimaki describes the same core sequence in its DTF process overview.
The physical process happens in production, but the artwork enters much earlier. Before a printer operator imports anything, the art department may need to:
- identify the correct customer file and latest revision;
- confirm the final print width and height;
- repair vector paths, raster pixels, masks and transparency;
- confirm whether white objects are intentional artwork or an unwanted background;
- prepare an approval proof;
- export and reopen the actual production file; and
- send a clear job note with anything the printer still needs to confirm.
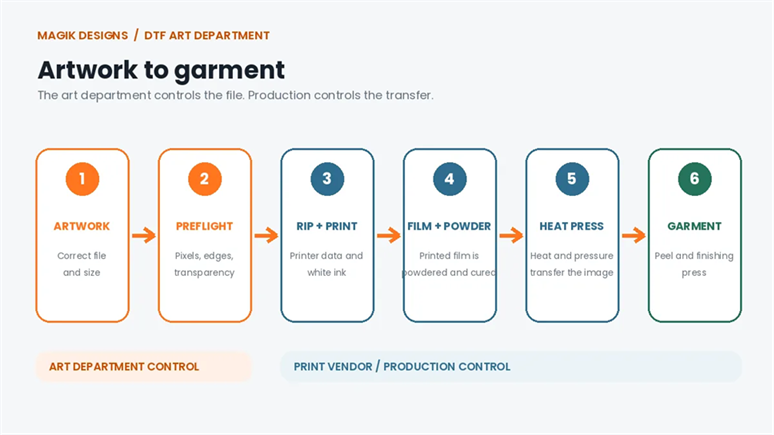
A DTF job moves from artwork preparation into printer-controlled production and transfer.
This training is therefore aimed at graphic designers, production designers, prepress staff, QA reviewers and art-department supervisors. It helps them understand where their responsibility begins, where it ends and when a job must be held for clarification.
Why DTF Problems Often Start Before the RIP
Operators regularly receive artwork that looks acceptable at a glance but is not ready for production. Common examples include a phone screenshot enlarged to chest-print size, a logo flattened onto a white rectangle, soft gray pixels around a supposedly transparent edge, missing fonts, an old revision or a file saved at the wrong dimensions.
The RIP cannot determine the customer’s intent. It may process a white rectangle as printable content, build white ink behind stray pixels or faithfully enlarge a low-resolution image. That is why DTF preflight must be more than opening the file and checking whether it looks good on a monitor.
A trained designer asks production questions:
- Is this the approved artwork?
- What exact size should print?
- Is the background truly transparent?
- Will fine detail survive the vendor’s tested process?
- Does the export contain only the intended printable artwork?
- Have we separated file problems from printer or transfer problems?
What the Art Department Controls
The art department controls the information inside the production file. Its job is to make the artwork intentional, measurable and traceable. That normally includes:
- Identity: correct customer, job, design, placement and revision.
- Content: spelling, names, numbers, dates, logos and approved visual changes.
- Dimensions: final print width and height without accidental distortion.
- Image quality: clean vector paths or enough real pixels at final size.
- Transparency: no unwanted background and no accidental deletion of white artwork.
- Edges: no white halo, dark fringe, stray pixels or hidden objects outside the design.
- Proof and revision control: the production file matches the latest approved proof.
- Export QA: the exported file has been reopened and inspected, not simply assumed to be correct.
The print vendor or printer operator controls the production environment. This normally includes the RIP preset, output profile, white-ink generation, underbase behavior, choke or spread, mirroring at output, nesting, printer condition, film, powder, curing and heat-press settings.
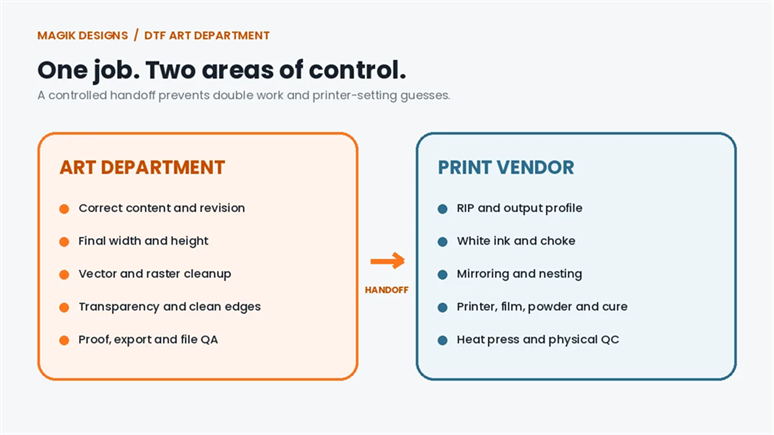
The art department owns file accuracy; the print vendor owns RIP and physical production settings.
This boundary is especially important when an outside vendor receives the file and the art department does not know which RIP is being used. Roland describes a RIP as software that converts artwork into data the printer can understand and supports wider control over color and print production. Functionality varies by RIP and device, so the design team should not invent settings that have not been supplied by the printer. See Roland DGA’s explanation of what a RIP does in digital printing.
What Graphic Design for DTF Really Means
DTF graphic design is not one activity. An art department usually performs three different types of work:
1. Creative design
The team creates or changes the visual idea. This can include a new layout, illustration, typography treatment, color option or complete redesign. Creative changes require approval because they change what the customer will see.
2. Production design
The visual idea is already approved, but it must be adapted for the order. Examples include resizing, creating names and numbers, arranging versions, rebuilding a logo, correcting paths or preparing multiple placements. The designer must protect the approved appearance while making the file usable.
3. Preflight
The team inspects whether the file can safely move into production. Preflight checks the job identity, final dimensions, pixels, transparency, edges, fonts, hidden objects, revision and export. It does not mean changing the design without permission.
Vector, Raster and Transparency Basics
Vector artwork
Vector artwork uses paths and shapes. It is usually the best source for logos, type and simple illustrations because it can scale without becoming pixelated. However, a vector file can still contain embedded raster images, missing fonts, clipping masks, unwanted objects or effects that need inspection.
Raster artwork
Raster artwork is made of pixels. Photos, screenshots and many downloaded images are raster files. The important measurement is not the PPI label by itself; it is the number of real pixels available at the final print size.
Effective PPI is calculated as pixels divided by final inches. A 1,200-pixel-wide image printed 4 inches wide has 300 effective PPI. The same image printed 12 inches wide has only 100 effective PPI. Changing the resolution field without adding real detail does not repair the image.
Transparency and white artwork
Transparency means the absence of pixels. White artwork is printable content. They may look similar on a white artboard, but they are not the same. A designer must inspect artwork on both light and dark backgrounds to confirm that the background is empty while intended white elements remain present.
Adobe notes that Photoshop’s background-removal workflow can create a transparent background or a masked layer, but the resulting mask may still need manual refinement. Adobe’s background removal guidance is a useful starting point, not a substitute for edge inspection.
DTF Artwork Preparation Checklist
Every live job should pass the same design-side checks. The order matters because there is no value repairing pixels before confirming that the team has the correct artwork and size.
- Confirm identity. Match the customer, job number, design, placement and latest revision.
- Confirm content. Read the spelling, names, numbers and dates. Check the correct logo version.
- Confirm final size. Record width and height in the job ticket. Check that resizing has not distorted the artwork.
- Inspect image quality. Review vector paths and raster pixels at the actual final output size.
- Inspect transparency. Use light and dark inspection backgrounds. Remove only unwanted pixels.
- Inspect edges and detail. Look for halos, stray pixels, tiny text, thin lines, fragile knockouts and distress that may disappear.
- Check revision and approval. Compare the working file with the latest approved proof and documented customer changes.
- Export and reopen. Inspect the delivered file for crop, bounds, background, size and format before release.
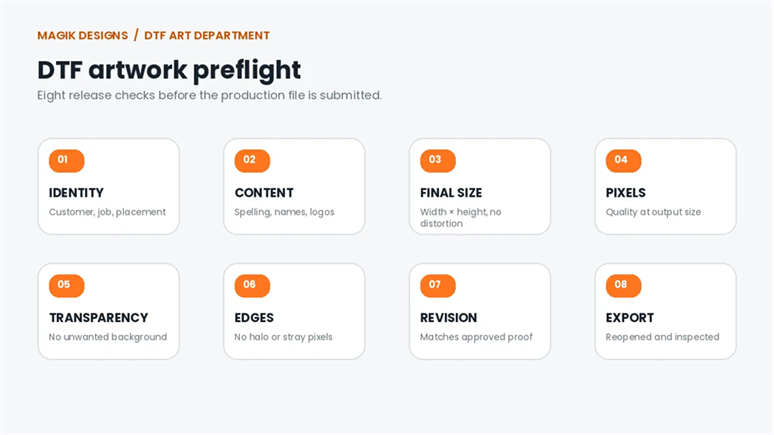
Eight checks that should be completed before a DTF production file is released.
Software Roles in a DTF Art Department
An efficient department does not force every task into the same application. Illustrator and InDesign are useful, but they solve different problems. Difficult raster cleanup normally requires Photoshop, and final PDF inspection is stronger in Acrobat Pro.
Adobe Illustrator
Use Illustrator for vector logos, paths, typography, exact dimensions and editable master artwork. It is also useful for organizing artboards and exporting production assets. Adobe’s Illustrator export guidance explains how artboards and supported file formats behave during export.
Adobe Photoshop
Use Photoshop for raster images, background removal, masks, pixel dimensions, image resolution and edge repair. A difficult halo or partially transparent edge should be inspected at pixel level instead of covered with a new background.
Adobe InDesign
Use InDesign for proof sheets, job sheets, client presentation pages and multi-page training documents. It is not the primary tool for rebuilding a logo, repairing raster edges or preparing a standalone transparent production asset.
Adobe Acrobat Pro
Use Acrobat Pro to reopen and inspect PDF deliveries. Confirm the page or art bounds, dimensions, missing fonts, unexpected objects and whether the correct proof has been packaged with the production file.
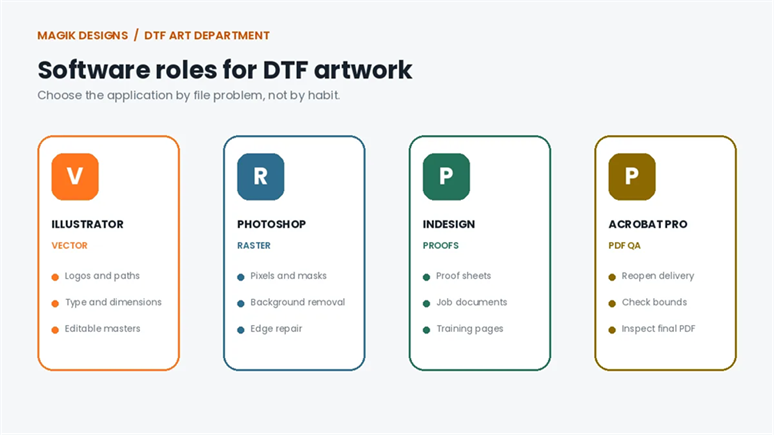
Use each application for the job it handles best instead of forcing every task into one program.
A Repeatable DTF Art Department Workflow
1. Receive
Save the customer’s original file unchanged. Create a working copy and log the job ID, requested size, quantity, garment or application, requested changes, due time and approval status.
2. Inspect
Check content, dimensions, pixels, transparency, edges, fonts, linked images, hidden objects and fine detail. Classify the job as ready, repairable, redesign required or hold for clarification.
3. Repair
Use Illustrator for vector work and Photoshop for raster or alpha work. Preserve an editable master. Do not overwrite the customer’s original and do not make visual changes that have not been approved.
4. Proof
Show the artwork, final print dimensions and revision. The proof should help the customer or internal reviewer confirm content and appearance; it should not be confused with the production asset.
5. QA
Reopen the actual exported production file. Compare it with the order information and the latest approved proof. A second reviewer should perform the release check on live production work.
6. Handoff
Send only the current production file, approved proof and job note. Keep old revisions out of the delivery folder. Record any unresolved printer-side decision instead of hiding it in an email thread.
What Not to Guess When the RIP Is Unknown
When artwork is being sent to an outside DTF vendor and the RIP is unknown, the safest default is a clean, correctly sized, vendor-neutral file plus a clear note. The design team should not create generic production settings based on habit.
- Do not invent a white underbase. White-ink generation and density depend on the printer, RIP, ink and production method.
- Do not invent choke or spread values. These are tested production settings, not universal design values.
- Do not mirror by habit. The printer or RIP may mirror at output. If both sides mirror, the image will be wrong.
- Do not assign a random color profile. Preserve the source information and ask for the vendor’s input requirement.
- Do not build a gang sheet without specifications. Sheet width, margins, spacing, rotation and nesting rules belong to the production system.
- Do not promise an exact physical color from the monitor alone. The final result also depends on output profiling, white ink, garment color and the transfer process.
Hold the job when: final size, wording, logo version, white-versus-transparent intent, revision, output format or printer-dependent instruction is unclear. Ask one specific question and record the answer.
Common DTF Artwork Problems
White background box
A flattened white background may receive white ink and transfer as a visible rectangle. Confirm whether the background is intentional before removing it.
Edge halo
Light or dark fringe around an object may become obvious on a different garment color. Inspect the alpha edge on both light and dark backgrounds and repair the mask instead of hiding the problem.
Low-resolution artwork
Enlargement exposes blur, blocks and jagged edges. Check actual pixel dimensions at the approved size. Rebuild simple logos as vector artwork when the source cannot support the requested output.
Fragile detail
Tiny text, very thin lines, narrow knockouts and fine distress may not survive a vendor’s print, powder and transfer process. Do not silently thicken or remove details. Flag the risk and request a tested minimum-detail specification or production sample.
Soft transparency
Shadows, glows and partially transparent pixels can interact with white-ink generation differently across RIP workflows. Preserve intentional alpha and request vendor validation when the expected behavior is uncertain.
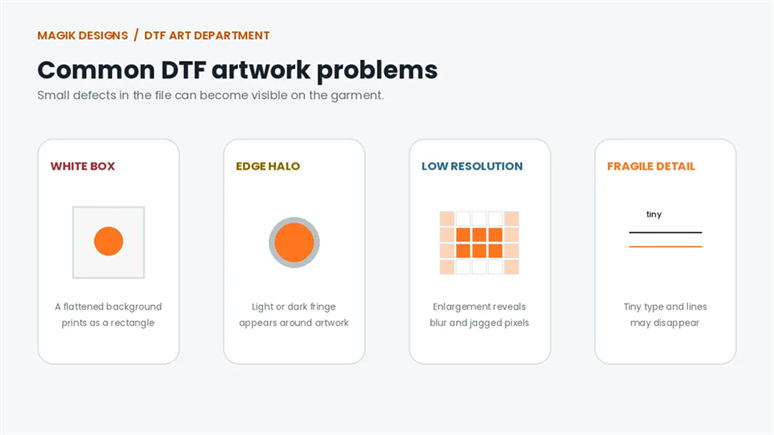
Small file defects can become visible after white ink, transfer and pressing.
Supervisor QA Before File Submission
The supervisor is not signing off that the garment will print perfectly under every production condition. The supervisor is signing off that the art department has completed its part correctly and has not guessed the printer’s part.
- Identity: Is this the correct customer, job, placement and latest artwork revision?
- Content: Are spelling, names, numbers, dates and logos correct?
- Size: Does the final width and height match the approved order without distortion?
- Image quality: Are vector and raster edges clean, and are the pixels acceptable at final size?
- Transparency: Is the background truly transparent, and is intended white artwork still present?
- DTF controls: Has the team avoided inventing white layers, choke, mirroring, profiles or gang rules?
- Export: Was the actual delivered file reopened and checked for crop, bounds, background, dimensions and format?
- Package: Does the delivery contain only the current production file, approved proof and job note?
A critical failure in identity, content, size, transparency, revision or export should stop release. It is cheaper to ask one question before submission than to replace film, powder, labor, garments and shipping after production.
How to Train New DTF Designers
New team members should not begin with live customer files. A practical foundation program can be completed in short modules:
- DTF process orientation: Explain the file-to-film-to-garment journey and the art department versus printer boundary.
- File inspection: Practice opening AI, PDF, EPS, PSD, PNG, TIFF and JPEG files and identifying vector, raster and transparency conditions.
- Repair exercises: Remove a background, refine an edge, rebuild a simple logo, correct dimensions and preserve an editable master.
- Proofing and revision control: Compare an order, proof and production file; identify which revision should be released.
- Export QA: Export a file, reopen it and document the final checks.
- Practical assessment: Complete a test job containing deliberate errors without changing approved content.
Assess the designer on both knowledge and execution. A person may understand the terminology but still release an old revision or fail to inspect the actual export. The practical test should therefore include critical errors such as a white box, wrong size, missing white object, weak pixels and an instruction to mirror without vendor confirmation.
DTF Artwork FAQ
What is the best file format for DTF printing?
The best format is the one specified by the actual print vendor. When that information is unavailable, a correctly sized transparent PNG can be a practical vendor-neutral raster handoff, while PDF, AI or EPS may be appropriate for editable vector artwork. The file must still be checked for content, dimensions, pixels, transparency and bounds. A file extension alone does not make artwork print-ready.
Does DTF artwork always need 300 DPI?
Do not judge the file by a DPI label alone. Check effective PPI at final print size and follow the vendor’s written requirement. Detailed raster artwork often benefits from a high effective resolution, but adding a higher number to the file without adding real pixels does not restore detail.
Should DTF artwork be RGB or CMYK?
Ask the printer which input color space and profile its RIP expects. Do not convert by habit. Preserve the approved appearance, record the source profile and let the device-specific workflow perform the final output conversion when that is the vendor’s process.
Should the art department mirror DTF files?
Only when the printer has assigned mirroring to the art department in writing. Many RIP workflows can mirror during output. Uncontrolled mirroring creates a risk that both the designer and the RIP reverse the image.
Who should create the white underbase?
The RIP or print vendor should normally control white-ink generation unless a tested, written workflow assigns that task to the art department. White density and choke are device-dependent production settings.
Can InDesign be used to prepare DTF artwork?
InDesign is useful for proof sheets and job documentation. Illustrator is better for vector production artwork, and Photoshop is better for raster cleanup, masks and transparency. The final production asset should be prepared in the application best suited to its content.
How can an art department tell whether a bad print is a file problem?
Compare the same approved production file across output attempts. If the file is unchanged but color, white density, curing, adhesion or transfer quality changes, inspect the RIP, printer, ink, film, powder, cure and press conditions before repeatedly editing correct artwork.
Build a DTF Art Department That Production Can Trust
Strong DTF artwork preparation is not about adding more technical steps. It is about assigning the right steps to the right team. Designers control artwork accuracy, dimensions, pixels, transparency, edges, proofs, revisions and export QA. Print operators control the RIP and physical production environment.
When both sides follow that boundary, the shop reduces avoidable corrections, repeated proofs, wrong-file output and arguments about whether a defect started in design or production.
Need structured DTF art-department support? Magik Designs helps printing businesses with graphic design, production design, prepress, proofing and controlled artwork workflows. Visit Magik Designs to discuss overflow support or a dedicated design workflow.